Electric vehicles are a national priority for governments and manufacturers alike. ONE MOTO were built a the time of change, we have developed our fleet of electric motorcycles to encourage fleet operators, delivery and logistics companies to make the change as inexpensively and effectively as possible. Air pollution in this region is among the most harmful on the planet! Through industry research we’ve found a large number of customers are unaware of how damaging two-wheeled vehicles are to our environment, and many accept the damage to their bottom line. In this article we will demonstrate the need to switch to electric motorcycles.
In alignment with the United Nations Sustainable Development Goals (SDGs), and in accordance with the region’s vision, The GCC is committed to both reducing emissions of Green House Gases (GHG) to curb climate change and reducing local air pollution emissions for the sake of public health.
According to World Bank cost assessment, environmental deterioration and its impact on health has been estimated to cost an alarming percentage of GDP, and the largest contributor is air pollution.
The transport sector in specific, is a key source of different types of pollution, including; carcinogens and smog forming pollutants; fine particulate matter (PM2.5), Nitrogen Oxides (NOx) and Sulphur Oxides, Hydrocarbons, soot…etc.
Furthermore, from the economic viewpoint, the phasing out of fuel subsidies is part of Egypt’s plan for economic reform, implying steady increase in fuel prices and thus a pressing need to explore fuel-saving solutions to offer citizens. Even with the foreseen phasing out (or rationalisation) of subsidies, the government will still need to reduce fuel consumption in passenger transport in order to save fuel that can be used more profitably elsewhere, such as in export, in industry, or in phasing out (or rationalisation) of subsidies, the government will still need to reduce fuel consumption in passenger transport in order to save fuel that can be used more profitably elsewhere, such as in export, in industry, or in petroleum-based products.
“Carbon dioxide emissions per capita for 20 Arab countries. The difference between emissions in the GCC and Arab non-Gulf countries immediately jumps out at the reader. The average for the Arab world (in 2013, the year for which the data was given) was exactly the same as that for the whole world: 5 metric tons per year, per person.
However, the average for the GCC was 19.7, while that of Arab non-Gulf countries was 2.5. The same trend can be seen in gasoline consumption and other indicators. Moreover, several Arab Gulf cities are listed among the 20 cities with the most polluted air in the world.” proving electric vehicles are a national priority.
Quote: Source-attribution ARAB NEWS 2018 – reporter Nidhal Guessoum
“With carbon dioxide emissions four times higher than the world average and eight times more than other Arab countries, the GCC needs to take strong measures to reduce air pollution”
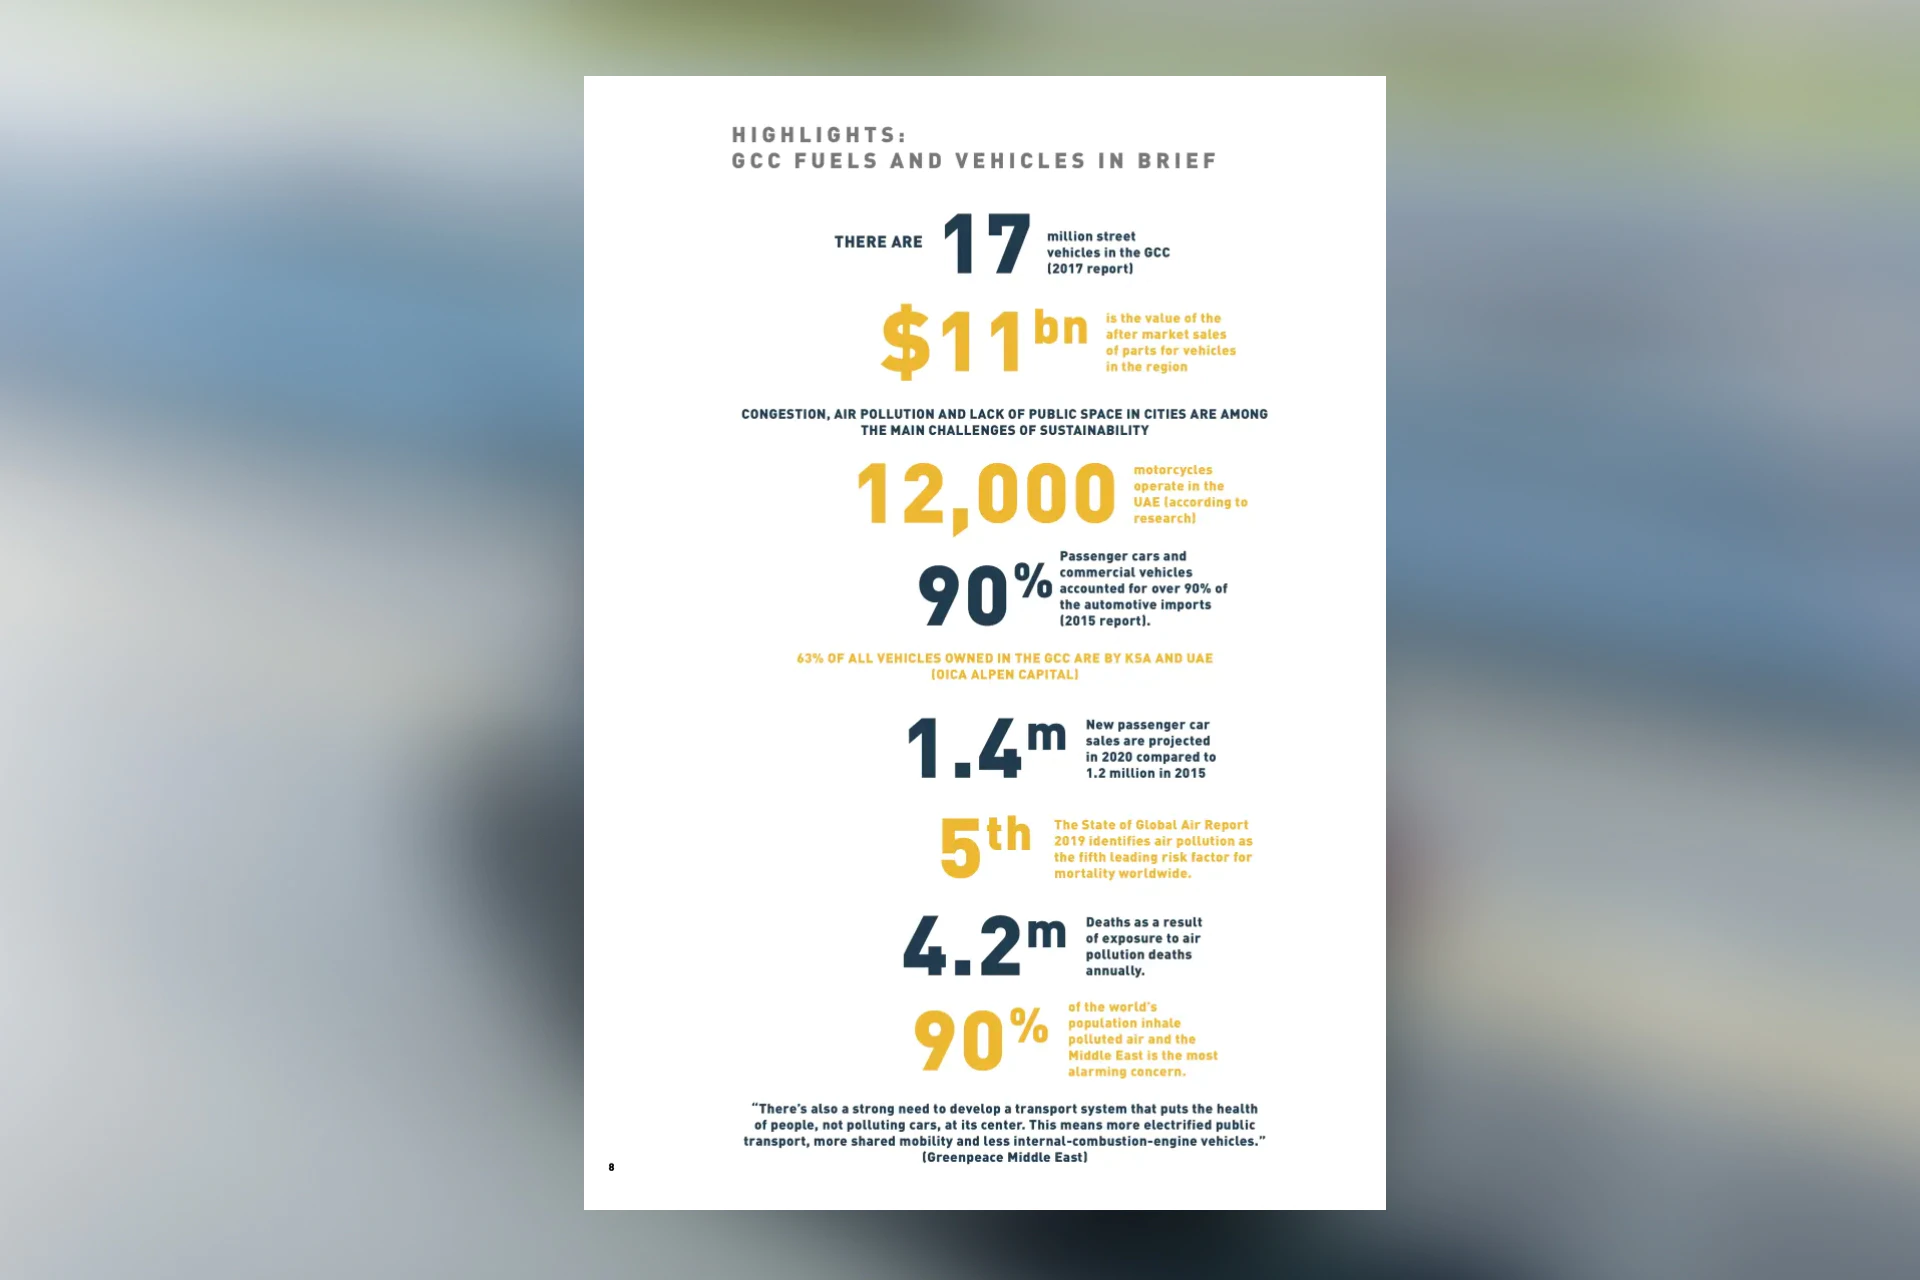
Here is an infographic showcasing the statistics of mobility in the GCC:
WHAT THE INTERNATIONAL RENEWABLES ENERGY AGENCY SAY ABOUT ELECTRIC VEHICLES
Electric vehicles (EVs) are becoming an increasingly popular and competitive option for clean transport. When using renewable- based electricity they offer significant opportunities to reduce local and global pollutant emissions. The key challenge is to rapidly reduce the costs of battery packs, improve their energy density and expand the recharging network. Although EVs are only just being deployed as mass-market vehicles, some offerings by certain manufacturers already look close to competitive with conventional internal combustion engine (ICE) powered vehicles.
As battery costs decline, the viability of electric vehicles will only increase and EVs will become the least cost option for a wider range of car owners and driving patterns.
EVs that rely 100% on batteries for energy require larger battery packs than plug-in hybrids (PHEVs). However, compared to PHEVs, the pure EV battery packs are cheaper per kWh due to less demanding operating requirements, meaning that incremental costs do not increase proportionately compared to a PHEV with an equivalent battery size. EV battery packs were estimated to cost around USD 500–800/ kWh in 2012, with average battery cell costs of approximately USD 400/kWh.
IRENA’s analysis indicates that cost reductions by 2020 could be significant, placing future battery-pack costs in the range of USD 300–400/kWh. Assuming battery costs decline to USD 350/kWh for EVs, the cost of battery packs could fall by USD 5,500 per vehicle (for a 23 kWh pack) or more for larger batteries. At the same time, improvements in battery performance should see vehicle ranges increase. By 2020 EVs could therefore become competitive with conventional vehicles for a wide range of driving patterns in urban areas.
KEY CHALLENGES
• Despite savings in maintenance, servicing (on electric cars), so incentives must be put in place for the transition.
Following a recent article in Arabian Business, this is what they have to say about ONE MOTO.
If you work in the first/last-mile, logistics, food delivery industries www.ONE-MOTO.com have a solution and it comes by the name ‘byka‘ these powerful two-wheeled electric motorcycles reduce your costs to the environment, your profit and the costs to your riders.
If you would like to discuss how Electric vehicles are a national priority in more detail, please contact us here.

